
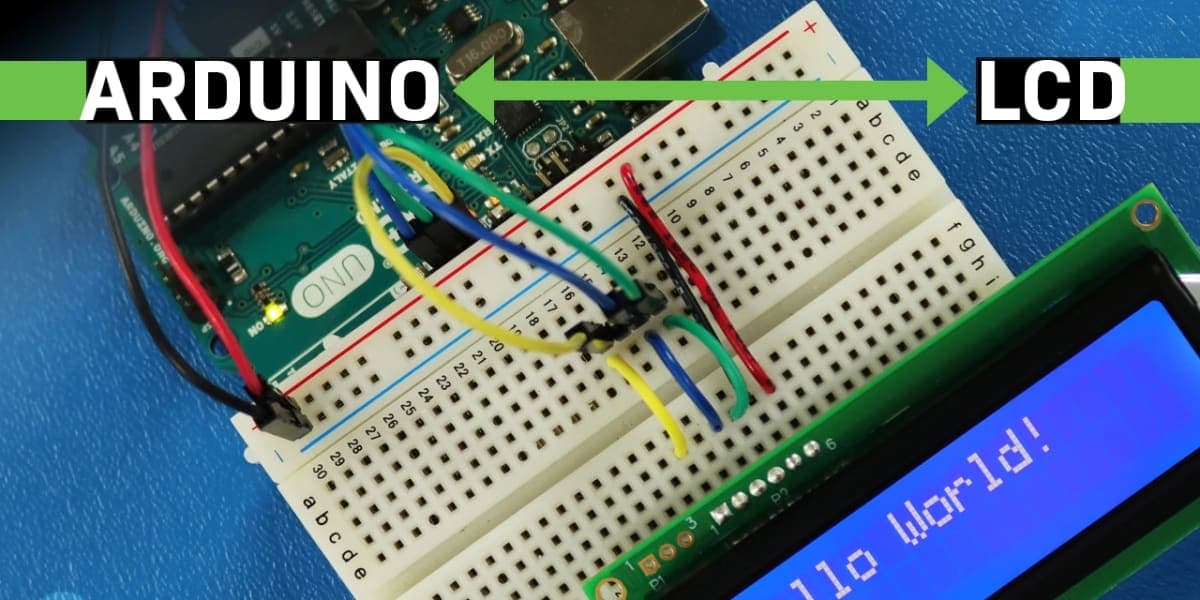
Liquid Crystal Displays (LCD) with Arduino The LiquidCrystal library allows you to control LCD displays that are compatible with the Hitachi HD44780 d...
Liquid Crystal Displays (LCD) with Arduino
The LiquidCrystal library allows you to control LCD displays that are compatible with the Hitachi HD44780 driver. There are many of them out there, and you can usually tell them by the 16-pin interface.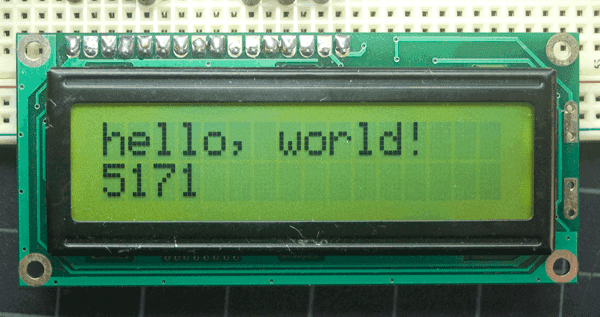
The LCDs have a parallel interface, meaning that the microcontroller has to manipulate several interface pins at once to control the display. The interface consists of the following pins:
- A register select (RS) pin that controls where in the LCD's memory you're writing data to. You can select either the data register, which holds what goes on the screen, or an instruction register, which is where the LCD's controller looks for instructions on what to do next.
- A Read/Write (R/W) pin that selects reading mode or writing mode
- An Enable pin that enables writing to the registers
- 8 data pins (D0 -D7). The states of these pins (high or low) are the bits that you're writing to a register when you write, or the values you're reading when you read.
There's also a display contrast pin (Vo), power supply pins (+5V and GND) and LED Backlight (Bklt+ and BKlt-) pins that you can use to power the LCD, control the display contrast, and turn on and off the LED backlight, respectively.
The process of controlling the display involves putting the data that form the image of what you want to display into the data registers, then putting instructions in the instruction register. The LiquidCrystal Library simplifies this for you so you don't need to know the low-level instructions.
The Hitachi-compatible LCDs can be controlled in two modes: 4-bit or 8-bit. The 4-bit mode requires seven I/O pins from the Arduino, while the 8-bit mode requires 11 pins. For displaying text on the screen, you can do most everything in 4-bit mode, so example shows how to control a 16x2 LCD in 4-bit mode.
Hardware Required
- Arduino Board
- LCD Screen (compatible with Hitachi HD44780 driver)
- pin headers to solder to the LCD display pins
- 10k ohm potentiometer
- 220 ohm resistor
- hook-up wires
- breadboard
Circuit
Note that this circuit was originally designed for the Arduino UNO. As the Arduino is communicating with the display using SPI, pin 11 & 12 will change depending on what board you are using. For example, on a MKR WiFi 1010, the SPI bus is attached to pin 8 & 11.
Before wiring the LCD screen to your Arduino board we suggest to solder a pin header strip to the 14 (or 16) pin count connector of the LCD screen, as you can see in the image further up.
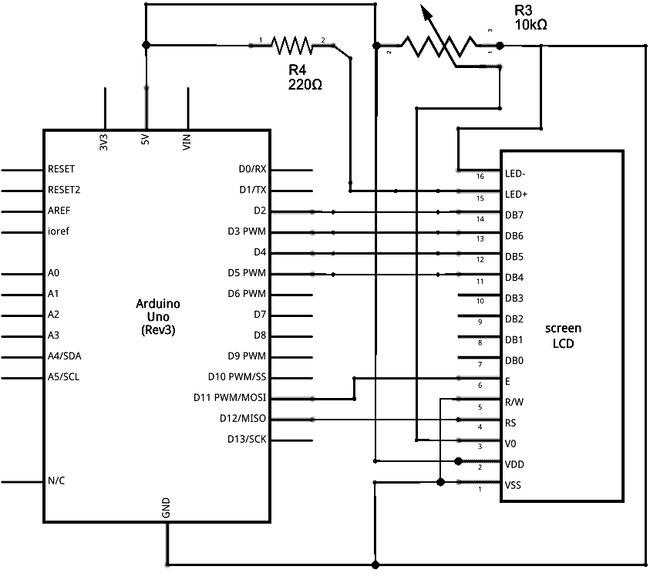
To wire your LCD screen to your board, connect the following pins:
- LCD RS pin to digital pin 12
- LCD Enable pin to digital pin 11
- LCD D4 pin to digital pin 5
- LCD D5 pin to digital pin 4
- LCD D6 pin to digital pin 3
- LCD D7 pin to digital pin 2
- LCD R/W pin to GND
- LCD VSS pin to GND
- LCD VCC pin to 5V
- LCD LED+ to 5V through a 220 ohm resistor
- LCD LED- to GND
Additionally, wire a 10k potentiometer to +5V and GND, with it's wiper (output) to LCD screens VO pin (pin3).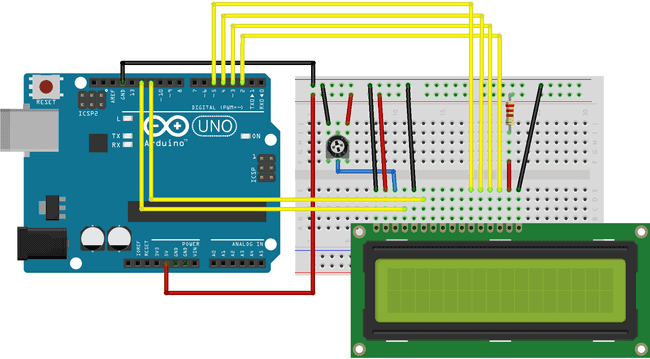
Schematic
Hello World Example
This example sketch prints
Hello World! to the LCD and shows the time in seconds since the Arduino was reset.
/*  LiquidCrystal Library - Hello World
 Demonstrates the use a 16x2 LCD display.  The LiquidCrystal library works with all LCD displays that are compatible with the Hitachi HD44780 driver. There are many of them out there, and you can usually tell them by the 16-pin interface.
 This sketch prints "Hello World!" to the LCD and shows the time.
  The circuit: * LCD RS pin to digital pin 12 * LCD Enable pin to digital pin 11 * LCD D4 pin to digital pin 5 * LCD D5 pin to digital pin 4 * LCD D6 pin to digital pin 3 * LCD D7 pin to digital pin 2 * LCD R/W pin to ground * LCD VSS pin to ground * LCD VCC pin to 5V * 10K resistor: * ends to +5V and ground * wiper to LCD VO pin (pin 3)
 Library originally added 18 Apr 2008 by David A. Mellis library modified 5 Jul 2009 by Limor Fried (http://www.ladyada.net) example added 9 Jul 2009 by Tom Igoe modified 22 Nov 2010 by Tom Igoe modified 7 Nov 2016 by Arturo Guadalupi
 This example code is in the public domain.
 https://docs.arduino.cc/learn/electronics/lcd-displays
*/
// include the library code:#include <LiquidCrystal.h>
// initialize the library by associating any needed LCD interface pin// with the arduino pin number it is connected toconst int rs = 12, en = 11, d4 = 5, d5 = 4, d6 = 3, d7 = 2;LiquidCrystal lcd(rs, en, d4, d5, d6, d7);
void setup() {  // set up the LCD's number of columns and rows:  lcd.begin(16, 2);  // Print a message to the LCD.  lcd.print("hello, world!");}
void loop() {  // set the cursor to column 0, line 1  // (note: line 1 is the second row, since counting begins with 0):  lcd.setCursor(0, 1);  // print the number of seconds since reset:  lcd.print(millis() / 1000);}
Autoscroll Example
This example sketch shows how to use the autoscroll() and noAutoscroll() methods to move all the text on the display left or right. autoscroll() moves all the text one space to the left each time a letter is added noAutoscroll() turns scrolling off This sketch prints the characters 0 to 9 with autoscroll off, then moves the cursor to the bottom right, turns autoscroll on, and prints them again.
/*
  LiquidCrystal Library - Autoscroll
 Demonstrates the use a 16x2 LCD display.  The LiquidCrystal
 library works with all LCD displays that are compatible with the
 Hitachi HD44780 driver. There are many of them out there, and you
 can usually tell them by the 16-pin interface.
 This sketch demonstrates the use of the autoscroll()
 and noAutoscroll() functions to make new text scroll or not.
 The circuit:
 * LCD RS pin to digital pin 12
 * LCD Enable pin to digital pin 11
 * LCD D4 pin to digital pin 5
 * LCD D5 pin to digital pin 4
 * LCD D6 pin to digital pin 3
 * LCD D7 pin to digital pin 2
 * LCD R/W pin to ground
 * 10K resistor:
 * ends to +5V and ground
 * wiper to LCD VO pin (pin 3)
 Library originally added 18 Apr 2008
 by David A. Mellis
 library modified 5 Jul 2009
 by Limor Fried (http://www.ladyada.net)
 example added 9 Jul 2009
 by Tom Igoe
 modified 22 Nov 2010
 by Tom Igoe
 modified 7 Nov 2016
 by Arturo Guadalupi
 This example code is in the public domain.
 http://www.arduino.cc/en/Tutorial/LiquidCrystalAutoscroll
*/
// include the library code:#include <LiquidCrystal.h>
// initialize the library by associating any needed LCD interface pin// with the arduino pin number it is connected to
const int rs = 12, en = 11, d4 = 5, d5 = 4, d6 = 3, d7 = 2;
LiquidCrystal lcd(rs, en, d4, d5, d6, d7);
void setup() {
  // set up the LCD's number of columns and rows:
  lcd.begin(16, 2);}
void loop() {
  // set the cursor to (0,0):
  lcd.setCursor(0, 0);
  // print from 0 to 9:
  for (int thisChar = 0; thisChar < 10; thisChar++) {
    lcd.print(thisChar);
    delay(500);
  }
  // set the cursor to (16,1):
  lcd.setCursor(16, 1);
  // set the display to automatically scroll:
  lcd.autoscroll();
  // print from 0 to 9:
  for (int thisChar = 0; thisChar < 10; thisChar++) {
    lcd.print(thisChar);
    delay(500);
  }
  // turn off automatic scrolling
  lcd.noAutoscroll();
  // clear screen for the next loop:
  lcd.clear();}
Blink Example
This example sketch shows how to use the blink() and noBlink() methods to blink a block-style cursor.
/*
  LiquidCrystal Library - Blink
 Demonstrates the use a 16x2 LCD display.  The LiquidCrystal
 library works with all LCD displays that are compatible with the
 Hitachi HD44780 driver. There are many of them out there, and you
 can usually tell them by the 16-pin interface.
 This sketch prints "Hello World!" to the LCD and makes the
 cursor block blink.
 The circuit:
 * LCD RS pin to digital pin 12
 * LCD Enable pin to digital pin 11
 * LCD D4 pin to digital pin 5
 * LCD D5 pin to digital pin 4
 * LCD D6 pin to digital pin 3
 * LCD D7 pin to digital pin 2
 * LCD R/W pin to ground
 * 10K resistor:
   * ends to +5V and ground
   * wiper to LCD VO pin (pin 3)
 Library originally added 18 Apr 2008
 by David A. Mellis
 library modified 5 Jul 2009
 by Limor Fried (http://www.ladyada.net)
 example added 9 Jul 2009
 by Tom Igoe
 modified 22 Nov 2010
 by Tom Igoe
 modified 7 Nov 2016
 by Arturo Guadalupi
 This example code is in the public domain.
 http://www.arduino.cc/en/Tutorial/LiquidCrystalBlink
*/
// include the library code:#include <LiquidCrystal.h>
// initialize the library by associating any needed LCD interface pin// with the arduino pin number it is connected to
const int rs = 12, en = 11, d4 = 5, d5 = 4, d6 = 3, d7 = 2;
LiquidCrystal lcd(rs, en, d4, d5, d6, d7);
void setup() {
  // set up the LCD's number of columns and rows:
  lcd.begin(16, 2);
  // Print a message to the LCD.
  lcd.print("hello, world!");}
void loop() {
  // Turn off the blinking cursor:
  lcd.noBlink();
  delay(3000);
  // Turn on the blinking cursor:
  lcd.blink();
  delay(3000);}
Comments (0)
No comments yet. Be the first to start the discussion.